jekyll-toc-plus
![]()
![]()
About this fork
jekyll-toc-plus is a fork of toshimaru/jekyll-toc.
All credit for the original plugin goes to its upstream authors — this fork simply adds a
few extra options (div_list, flat_list, toc_only_direct_text, and per-page
toc_config overrides) on top of their work, and is published to RubyGems so others can
gem install it directly.
It is otherwise a drop-in replacement. The maintainer makes no promise to maintain this as a full author, but contributions and pull requests are welcome.
Table of Contents
Installation
Add jekyll-toc-plus plugin in your site's Gemfile, and run bundle install.
gem 'jekyll-toc-plus'
Add jekyll-toc-plus to the plugins: section in your site's _config.yml.
plugins:
  - jekyll-toc-plus
Set toc: true in posts for which you want the TOC to appear.
---
layout: post
title: "Welcome to Jekyll!"
toc: true
---
Usage
There are three Liquid filters, which can be applied to HTML content,
e.g. the Liquid variable content available in Jekyll's templates.
Basic Usage
toc filter
Add the toc filter to your site's {{ content }} (e.g. _layouts/post.html).
{{ content | toc }}
This filter places the TOC directly above the content.
Advanced Usage
If you'd like separated TOC and content, you can use {% toc %} tag (or toc_only filter) and inject_anchors filter.
{% toc %} tag / toc_only filter
Generates the TOC itself as described below. Mostly useful in cases where the TOC should not be placed immediately above the content but at some other place of the page, i.e. an aside.
<div>
  <div id="table-of-contents">
    {% toc %}
  </div>
  <div id="markdown-content">
    {{ content }}
  </div>
</div>
:warning: {% toc %} Tag Limitation
{% toc %} works only for Jekyll Posts and Jekyll Collections.
If you'd like to use {% toc %} except posts or collections, please use toc_only filter as described below.
<div>
  <div id="table-of-contents">
    {{ content | toc_only }}
  </div>
  <div id="markdown-content">
    {{ content | inject_anchors }}
  </div>
</div>
inject_anchors filter
Injects HTML anchors into the content without actually outputting the TOC itself. They are of the form:
<a class="anchor" href="#heading1-1" aria-hidden="true">
  <span class="octicon octicon-link"></span>
</a>
This is only useful when the TOC itself should be placed at some other
location with the toc_only filter.
Generated HTML
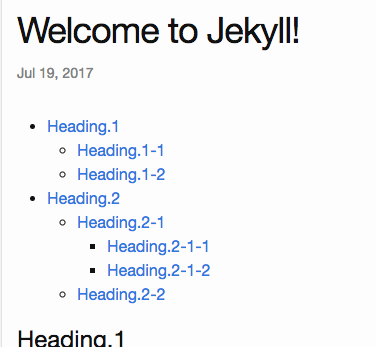
jekyll-toc generates an unordered list by default. The HTML output is as follows.
<ul id="toc" class="section-nav">
  <li class="toc-entry toc-h1"><a href="#heading1">Heading.1</a>
    <ul>
      <li class="toc-entry toc-h2"><a href="#heading1-1">Heading.1-1</a></li>
      <li class="toc-entry toc-h2"><a href="#heading1-2">Heading.1-2</a></li>
    </ul>
  </li>
  <li class="toc-entry toc-h1"><a href="#heading2">Heading.2</a>
    <ul>
      <li class="toc-entry toc-h2"><a href="#heading2-1">Heading.2-1</a>
        <ul>
          <li class="toc-entry toc-h3"><a href="#heading2-1-1">Heading.2-1-1</a></li>
          <li class="toc-entry toc-h3"><a href="#heading2-1-2">Heading.2-1-2</a></li>
        </ul>
      </li>
      <li class="toc-entry toc-h2"><a href="#heading2-2">Heading.2-2</a></li>
    </ul>
  </li>
</ul>
Customization
jekyll-toc is customizable on _config.yml.
Default Configuration
# _config.yml
toc:
  min_level: 1
  max_level: 6
  ordered_list: false
  no_toc_section_class: no_toc_section
  list_id: toc
  list_class: section-nav
  sublist_class: ''
  item_class: toc-entry
  item_prefix: toc-
  div_list: false
  flat_list: false
  toc_only_direct_text: false
TOC levels
# _config.yml
toc:
  min_level: 2 # default: 1
  max_level: 5 # default: 6
The default heading range is from <h1> to <h6>.
Per-Page TOC Level Override
You can override the min_level and max_level settings for individual pages or posts by adding a toc_config key to the YAML front matter:
---
layout: post
title: "My Post"
toc: true
toc_config:
  min_level: 2  # Override: Start from H2 for this page only
  max_level: 4  # Override: Stop at H4 for this page only
---
This is useful when you want different TOC depths for different types of content.
Enable TOC by default
You can enable TOC by default with Front Matter Defaults:
# _config.yml
defaults:
  - scope:
      path: ""
    values:
      toc: true
Skip TOC
The heading is ignored in the toc by adding no_toc class.
<h1>h1</h1>
<h1 class="no_toc">This heading is ignored in the TOC</h1>
<h2>h2</h2>
Skip TOC Sectionally
The headings are ignored inside the element which has no_toc_section class.
<h1>h1</h1>
<div class="no_toc_section">
  <h2>This heading is ignored in the TOC</h2>
  <h3>This heading is ignored in the TOC</h3>
</div>
<h4>h4</h4>
Which would result in only the <h1> & <h4> within the example being included in the TOC.
The class can be configured on _config.yml:
# _config.yml
toc:
  no_toc_section_class: exclude # default: no_toc_section
Configuring multiple classes are allowed:
# _config.yml
toc:
  no_toc_section_class:
    - no_toc_section
    - exclude
    - your_custom_skip_class_name
toc_only_direct_text
By default, the TOC includes all text content from headings, including text within nested HTML elements. The toc_only_direct_text option allows you to extract only the direct text nodes from headings, excluding all child elements.
This is particularly useful when using custom HTML components or tags within headings (like badges, icons, or status indicators) that you don't want to appear in the table of contents.
# _config.yml
toc:
  toc_only_direct_text: true # default: false
Example:
Given this heading:
<h2>formatName <tag>Required</tag></h2>
- With
toc_only_direct_text: false(default): TOC shows "formatName Required" - With
toc_only_direct_text: true: TOC shows "formatName"
Per-page override:
You can override this setting for specific pages using front matter:
---
layout: post
title: "My Post"
toc: true
toc_config:
  toc_only_direct_text: true
---
CSS Styling
The toc can be modified with CSS. The sample CSS is the following.
.section-nav {
  background-color: #fff;
  margin: 5px 0;
  padding: 10px 30px;
  border: 1px solid #e8e8e8;
  border-radius: 3px;
}
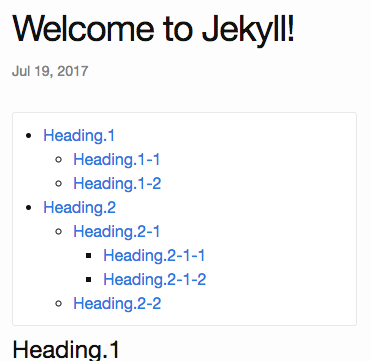
Each TOC li entry has two CSS classes for further styling. The general toc-entry is applied to all li elements in the ul.section-nav.
Depending on the heading level each specific entry refers to, it has a second CSS class toc-XX, where XX is the HTML heading tag name.
For example, the TOC entry linking to a heading <h1>...</h1> (a single # in Markdown) will get the CSS class toc-h1.
Custom CSS Class and ID
You can apply custom CSS classes to the generated <ul> and <li> tags.
# _config.yml
toc:
  list_id: my-toc-id # Default: "toc"
  list_class: my-list-class # Default: "section-nav"
  sublist_class: my-sublist-class # Default: no class for sublists
  item_class: my-item-class # Default: "toc-entry"
  item_prefix: item- # Default: "toc-":
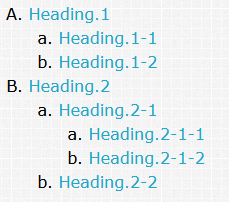
Using Unordered/Ordered lists
By default the table of contents will be generated as an unordered list via <ul></ul> tags. This can be configured to use ordered lists instead <ol></ol>.
This can be configured in _config.yml:
# _config.yml
toc:
  ordered_list: true # default is false
In order to change the list type, use the list-style-type css property.
Add a class to the sublist_class configuration to append it to the ol tags so that you can add the list-style-type property.
Example
# _config.yml
toc:
  ordered_list: true
  list_class: my-list-class
  sublist_class: my-sublist-class
.my-list-class {
  list-style-type: upper-alpha;
}

.my-sublist-class {
  list-style-type: lower-alpha;
}
This will produce:
Using divs as list elements
By default, the table of contents is generated using <ul>, <ol>, and <li> tags. If you prefer to use <div> elements instead (for custom styling or accessibility reasons), you can enable this by setting the div_list option in your _config.yml:
# _config.yml
toc:
  div_list: true # default is false
When div_list is set to true, the TOC will be rendered using <div> elements for both the list container and each entry, instead of <ul>, <ol>, and <li>. You can still use the list_class, sublist_class, and item_class options to add custom CSS classes for styling:
# _config.yml
toc:
  div_list: true
  list_class: my-list-class
  sublist_class: my-sublist-class
  item_class: my-item-class
Example CSS for styling the TOC with <div> elements:
.my-list-class {
  /* Styles for the TOC container */
  margin: 10px 0;
}

.my-item-class {
  /* Styles for each TOC entry */
  padding: 4px 0;
}

.my-sublist-class {
  /* Styles for nested TOC containers */
  margin-left: 20px;
}
This will produce a TOC structure like:
<div id="toc" class="my-list-class">
  <div class="my-item-class toc-h1"><a href="#heading1">Heading.1</a>
    <div class="my-sublist-class">
      <div class="my-item-class toc-h2"><a href="#heading1-1">Heading.1-1</a></div>
      <div class="my-item-class toc-h2"><a href="#heading1-2">Heading.1-2</a></div>
    </div>
  </div>
  <div class="my-item-class toc-h1"><a href="#heading2">Heading.2</a></div>
</div>
Use this option if you want more flexibility in styling or need to avoid list semantics for accessibility or design reasons.
Using a flat list
By default, the table of contents is generated as a nested structure that reflects the hierarchy of headings in your content. If you prefer a flat list with no nesting (where all TOC entries appear at the same level regardless of their heading level), you can enable this by setting the flat_list option in your _config.yml:
# _config.yml
toc:
  flat_list: true # default is false
When flat_list is set to true, all TOC entries will be rendered at the same level without any nesting, while still retaining the CSS classes that indicate their heading level. This is useful when you want to style headings differently based on their level but prefer a simplified, non-nested list structure.
The flat list option works with both standard lists (<ul>, <ol>) and div-based lists (when div_list is set to true).
Example with standard lists:
<ul id="toc" class="section-nav">
  <li class="toc-entry toc-h1"><a href="#heading1">Heading.1</a></li>
  <li class="toc-entry toc-h2"><a href="#heading1-1">Heading.1-1</a></li>
  <li class="toc-entry toc-h2"><a href="#heading1-2">Heading.1-2</a></li>
  <li class="toc-entry toc-h1"><a href="#heading2">Heading.2</a></li>
  <li class="toc-entry toc-h2"><a href="#heading2-1">Heading.2-1</a></li>
  <li class="toc-entry toc-h3"><a href="#heading2-1-1">Heading.2-1-1</a></li>
</ul>
Example with div-based lists:
<div id="toc" class="section-nav">
  <div class="toc-entry toc-h1"><a href="#heading1">Heading.1</a></div>
  <div class="toc-entry toc-h2"><a href="#heading1-1">Heading.1-1</a></div>
  <div class="toc-entry toc-h2"><a href="#heading1-2">Heading.1-2</a></div>
  <div class="toc-entry toc-h1"><a href="#heading2">Heading.2</a></div>
  <div class="toc-entry toc-h2"><a href="#heading2-1">Heading.2-1</a></div>
  <div class="toc-entry toc-h3"><a href="#heading2-1-1">Heading.2-1-1</a></div>
</div>
Use this option when you want a simplified TOC structure but still want to style entries differently based on their heading level using CSS. For example:
.toc-h1 { font-weight: bold; font-size: 1.2em; }
.toc-h2 { font-weight: normal; font-size: 1.1em; }
.toc-h3 { font-style: italic; font-size: 1em; }
Alternative Tools
- Adding anchor to headings
- Generating TOC for kramdown content